Garden Harvest and Soil Prep for the Next Growing Season
Good day friends. I usually like to share tips and tricks on how to build some of our products for the DIY'er but, as most of us are trying to make the most of the last days of summer, some of us are getting ready for the tastes of autumn. Today we’ll talk about harvesting your vegetable/fruit garden and some tips and tricks to help you along the way. Whether your garden was a continual picking throughout the season or if you grew something with a onetime seasonal harvest, we will run through some tips and tricks to get the most out of what you grew. 
So, did you grow tomato’s, beans, grapes, carrots, strawberries or did you go big with something like corn or wheat? Whatever the fruit or vegetable, it’s time to reap your rewards or the fruits of your labor. Pun intended. First things first. Are they ready to be picked? Depending on the vegetable or fruit you grew, researching when is the optimal time to harvest could be what stands between something delicious and vibrant or dull and bland. Color and firmness are great factors in determining when something should be picked. Dried or dead leaves are a great way of telling your root veggies are ready to be picked.
Things to look for:
Root Vegetables
- Beets and turnips can be pulled any time after they reach golf ball size. Leaving them longer will allow for growth but too long will make them tougher and give a woody texture.
- Carrots can be pulled after they reach a usable size. For baby carrots usually 50-60 days from planting day and for more mature carrots around 75 days.
- Potatoes are usually harvested after 10 or 12 weeks. Rubbing the skin with your thumb is another good tip. If the skin stays intact, then they are ready to be harvested.

Fruiting Vegetables
- Peas – feel the pod for the developing peas inside. You will need to shell a few just to be sure. Usually around 60-70 days
- Beans, feel the pod. They should not feel the same as peas. No bulging. Avoid waiting too long to pick as they will become stringy.
- Fruiting vegetables like tomatoes, peppers, and cucumber, look for even color over the whole item. This will determine ripeness. Clipping instead of pulling from the vine is recommended as this will not damage the vine.
- Zucchini is by far the one veggie that is picked when too big. The best tasting is when they reach a length of 4-5 inches.

Salad Leaves
- Salad leaves should be picked early in the morning. This will ensure that they are at their most succulent. 3-6” long are ideal for picking. If they are a bit wilted from the heat, a quick ice bath will perk them right up.
- Beet leaves have a mild sweet flavor (between swiss chard and spinach) and are a great addition to your salads, smoothies, or pesto.
- Cut cabbages as soon as the fleshy leaves have formed a tight, firm head. Around 82 days after planting. Winter frosts help to enrich the flavor of Savoy types, so leave these in the ground until you’re ready to eat them. Cabbage family plants producing flower buds, such as calabrese, broccoli or cauliflower, should be picked while the buds are still tightly closed. Usually in the morning.
- Garlic, onions and shallots may be dug up as soon as the foliage starts to die down in late summer for using fresh. For storing, wait two weeks once the foliage has turned yellow and toppled over, then dig up the bulbs and cure them for storing in a cool, dry place.

Berries
- Use your senses to pick soft fruits at their prime. Berries and currants should be evenly colored. Raspberries will come away easily from their plug, while blackcurrants should be left a week after turning black to develop their full flavor. Blueberries develop their best flavor two or three days after turning blue. Berries can be picked every 4 to 6 weeks after blossoming.
 Your harvest is complete, and you are enjoying the crop you grew at the family dinner table. Rave reviews from the family and guests on how fresh and vibrant your crop has yielded. You love the accolades for a job well done and are looking forward to the next growing season. Thinking of all the hard work you put in this past spring seems a little daunting to have to do again. Especially if this was your first time at growing vegetables. Well, you don’t have to go through all that again. Here are some great ideas on how to prepare in the fall for your springtime planting session.
Soil Preparation
- Take a test. Soil testing is done to determine if you need to raise the Ph level. Lime and elemental sulfur will help in this. You can take soil samples at anytime of the year, with fall being preferable. That way you can get your results and make any fixes in time for spring.
- Soil Health: The Earthworm Test. The best time to check for earthworms is in spring when the soil's temperature has reached 50°F and its surface is moist. Using a shovel, dig up about 1 cubic foot of soil. Break the soil apart and look for earthworms. If your soil is healthy, you should find at least 10 earthworms. If fewer than 10, add some organic matter like compost, aged manure, or leaf mold. Organic matter improves structure, slowly releases nutrients, and increases beneficial microbial activity.
- Leave the roots. Do you still have some plants left to remove? Instead of digging to get every last root, just give the plants a quick tug and take what comes up easily. The part of the root system that's left behind will feed beneficial microbes, whose digestive efforts produce humus. Humus not only helps keep soil moist and aerated, but also assists plants in getting the nutrients they need to flourish.
- Add compost. Place a 3- to 4-inch layer of compost on your garden, then use a digging fork to gently work it into the soil. If you get your compost in place while soil is still warm, the microbes and beneficial soil-dwelling critters will start working right away to break it down and get it ready for spring.
- Spread some manure. Manure applied during the spring needs to be composted first. But when you apply it in fall to a garden that won't be planted until spring, you can go ahead and use the fresh stuff (assuming you can handle the odor!). The ammonia that's present will disappear over winter, leaving you with rich organic matter come spring. There are a variety of manures you could use cow, horse, chicken, sheep or goat.
- Sprinkle with fertilizer. If you don't want to go the manure route, try lightly applying an organic fertilizer like greensand, rock phosphate, kelp meal, bonemeal, or bloodmeal. When they aren't overapplied, organic fertilizers like these release nutrients slowly over a period of several months. Adding them to the garden in fall gives them ample time to be transformed into materials that will be readily absorbed by eager spring roots. You could also go with a food safe commercial fertilizer. 3:1:2, 6:2:4 or 9:3:6 are the ideal ratios to go by. Nitrogen, Phosphorous, Potassium (NPK).
- Pile on the leaves. No matter what form of compost or fertilizer you've put on the garden, cover it with a layer of fall leaves that you've chopped up with the mower. This is a great way to insulate the soil and encourage worms to stay active longer into the season.

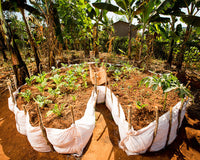
We encourage growers to make notes about what did well this past year and what didn’t and start planning for next year, including making room for new garden beds. Did you know our modular beds are expandable? Now is a great time to plan for next years crop maybe on a larger scale! Did you miss out on growing cucumbers, tomatoes, or peas? We have planters with trellises to support your vined goodies. Our trellises will not heat up and burn your vines like metal trellises. Trellised plants need less water. Instead of watering a sprawling plant you can just water the base where the roots are located. Great for small spaces, easier harvesting, and increased accessibility for gardeners. Something that is quite beneficial is square foot gardening. Square foot gardening can increase your yields, while providing excellent access watering and pest/weed control. Water consumption is improved due to the concentration of plants and soil in the beds. We have gardens with Gro-Grids to make this easier for you. 
Thank you for your time and be sure to check back in a couple of weeks when our next blogger shares some delicious harvest time recipes. Bring your appetite, you won’t be disappointed.
Thank you.
Until next time,
Pete